What We're Building &
Setting Up Your Environment
Over the next ten parts, we'll build a complete café website from nothing but empty files. Today, we'll preview the finished product, set up our code editor, and get our very first webpage to appear in a browser.
Welcome to This Series
- Preview the finished café website we'll build throughout this series
- Install a code editor (VS Code) and add essential extensions
- Create a project folder structure and download the image assets
- Create your first HTML file and display "Hello World" in a browser
Hi there — I'm Kanon Narumiya, creative director at DE:ZIGN. I'm really glad you're here.
I created this series for anyone who wants to build a website but isn't sure where to start. You don't need any prior experience with HTML or CSS. Over ten parts, we'll work through everything step by step, and by the end you'll have built a complete, real website with your own hands.
I taught myself web development while studying at art school. In the beginning, I didn't even know which text editor to use — I just kept searching, getting confused, searching again. So I understand that first-step anxiety really well. That's exactly why I've tried to make every step in this series as clear and friction-free as possible.
You don't need any special talent to write code. All you need is a computer that can type text — and the desire to make something.
Let's See the Finished Product
Before we write a single line of code, let's look at what we're going to build.
View the finished demo →
We're building the website for café SOEL — a fictional modern café with a warm, minimalist aesthetic. It's a single-page site that starts with a hero image, then flows through a concept section, a menu with photos, a gallery, and store information.
If you're thinking "Can I really build something like this?" — the answer is yes. This entire site is built with nothing but HTML and CSS. No frameworks, no complicated programming. We'll add each piece one step at a time, and you'll get there.
The Road Ahead
Here's a quick overview of the ten parts. In Part 1 (that's today) we'll set up our tools. Parts 2 and 3 cover HTML — the structural skeleton of the site. Parts 4 through 7 introduce CSS to handle layout, styling, and design polish. Part 8 tackles SEO, Part 9 covers accessibility and performance, and Part 10 walks you through uploading the site to a real server.
There are also three bonus parts after the main series: CSS animations, a touch of JavaScript for interactivity, and a collection of design customization recipes. Those are for anyone who wants to go further after completing the core ten.
Setting Up Your Code Editor
To build a website, you need an application for writing code — a code editor. We'll be using Visual Studio Code (VS Code for short) throughout this series.
Installing VS Code
Visit the Official Site
Open https://code.visualstudio.com/ in your browser. You'll see a large blue download button right away.
Download and Install
The site automatically detects your operating system. Click the download button, then run the installer and follow the on-screen instructions. On a Mac, open the downloaded .dmg file and drag the VS Code icon into your Applications folder.
Launch VS Code
Open VS Code once the installation is complete. If you see a Welcome tab, you're all set. You may be asked to choose a display language on the first launch — either English or your preferred language is fine.
Essential Extensions
VS Code becomes much more powerful with extensions. Here are three that will be especially useful throughout this series.
Installing extensions is simple: click the square icon in the left sidebar (the Extensions view), type the extension name into the search bar, and click "Install."
Live Server
This extension lets you preview your HTML file in a browser in real time. Every time you save, the browser refreshes automatically — no manual reloading needed. We'll rely on this throughout the entire series.
Prettier - Code Formatter
Prettier automatically tidies up your code — fixing indentation, spacing, and line breaks. It helps you build a habit of writing clean, readable code. After installing, I recommend enabling "Format On Save" so it runs automatically every time you save a file.
Auto Rename Tag
When you rename an opening HTML tag, this extension automatically renames the closing tag to match. It's a small thing, but it saves time and prevents mismatched-tag errors that can be tricky to spot.
Creating the Project Folder
With the editor ready, let's create a folder to hold all our site files. In web development, we keep HTML, CSS, images, and scripts together in a single folder — often called the "project folder."
Create the Main Folder
Anywhere you like — your Desktop, Documents, wherever — create a new folder called cafe-soel. Use lowercase letters, numbers, and hyphens only. Spaces and special characters in folder names can cause problems when you upload to a server later.
Create Sub-Folders
Inside cafe-soel, create three folders: css, img, and js. These will hold our CSS stylesheets, image files, and JavaScript files respectively.
cafe-soel/
├── index.html    ← creating today
├── css/
│   └── style.css ← Part 4
├── img/
│   ├── hero.jpg
│   ├── concept.jpg
│   ├── menu-coffee.jpg
│   ├── menu-latte.jpg
│   ├── menu-cake.jpg
│   ├── menu-sandwich.jpg
│   ├── interior-01.jpg
│   ├── interior-02.jpg
│   ├── exterior.jpg
│   ├── logo.png
│   ├── ogp.jpg
│   └── favicon.svg
└── js/
    └── main.js   ← Bonus parts
This is what the final structure will look like. For now, just having the folders is enough — we'll create the files one by one as the series progresses.
Open the Folder in VS Code
In VS Code, go to File → Open Folder and select the cafe-soel folder you just created. The Explorer panel on the left should now show your folder contents. You're ready to start working.
Downloading the Image Assets
I've prepared all the images we'll use in this series as a single ZIP download. We won't use them until Part 3, but let's get them into our project folder now so everything is ready.
Download image assets →
The ZIP contains hero images, menu photos, interior and exterior shots, the logo, an OGP image, and an SVG favicon — 12 files in total.
You don't need to worry about them yet. As the series progresses, I'll tell you exactly which image to use and when. As long as they're all sitting in the img folder, you're good to go.
Your Very First HTML File
Time to create our first HTML file. We're not going to write anything complicated yet. The goal right now is simply to create a file and see some text appear in a browser.
Create index.html
In VS Code's Explorer panel, right-click on the cafe-soel folder and select "New File." Name it index.html.
Write the Code
The file should open automatically. Type (or paste) the following code. If you have the time, I'd encourage you to type it by hand — the physical act of typing helps the structure stick in your memory.
<!DOCTYPE html>
<html lang="en">
<head>
  <meta charset="UTF-8">
  <title>café SOEL</title>
</head>
<body>
  <h1>Hello World!</h1>
  <p>We're going to build the café SOEL website.</p>
</body>
</html>
Don't worry if you don't understand what each line does yet. We'll break it all down in Part 2. For now, just trust that this is what a basic webpage looks like.
One thing I will mention: the very first line, <!DOCTYPE html>, is a declaration that tells the browser "this file is written in HTML." Think of it as a small but important handshake between your file and the browser. Without it, the browser might not display things correctly — so always include it on the first line.
Viewing It in the Browser
Let's see our code come to life. This is where Live Server earns its keep.
Launch with Live Server
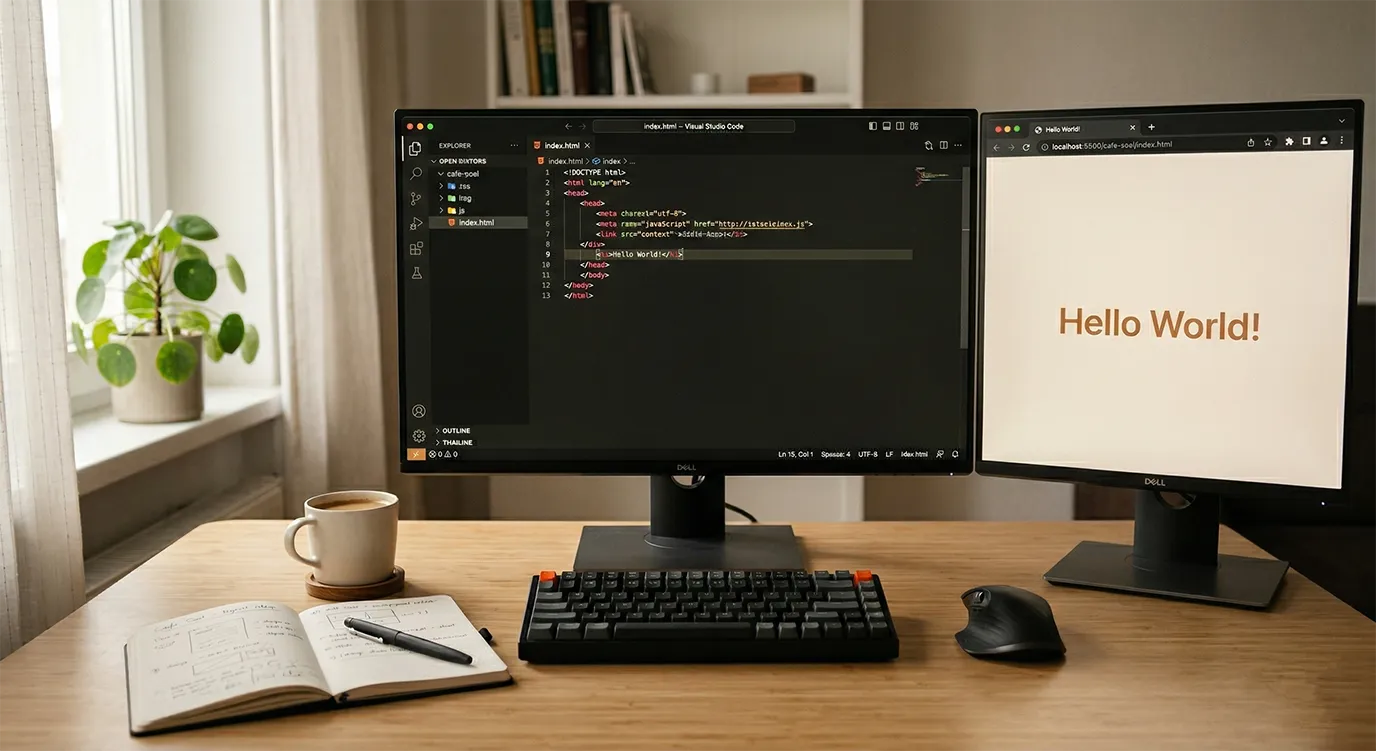
With index.html open in VS Code, look at the bottom-right corner of the window and click the "Go Live" button. Your default browser will open automatically and display the page.
Check the Result
You should see "Hello World!" in large bold text, followed by "We're going to build the café SOEL website." in regular text. If you see that — congratulations, it's working.
Hello World!
We're going to build the café SOEL website.
There it is — your very first webpage. It's plain, it's simple, and it's wonderful. This is a real HTML document rendering in a real browser. From here, we'll layer on CSS for colors and layout, and that plain page will gradually transform into the polished demo site you saw earlier.
Try a Quick Edit
Let's see Live Server's auto-reload in action. Go back to VS Code and change the text inside <h1> from "Hello World!" to "Welcome to café SOEL." Save the file with Ctrl + S (or Cmd + S on Mac).
Now look at your browser — it should have updated without you clicking refresh. That's the live reload doing its thing. Throughout this series, we'll be constantly writing code and checking the browser. Not having to manually reload every time makes the whole process so much smoother.
Checkpoint
If everything went smoothly, here's where you should be right now.
・Extensions installed: Live Server, Prettier, Auto Rename Tag
・cafe-soel folder contains css, img, and js sub-folders
・img folder contains all 12 image assets
・index.html was created and displayed successfully in the browser
If something isn't working, don't worry. Most errors at this stage come down to a typo or a file being in the wrong place. Double-check your file names and folder locations — that usually solves it.
Setting up your environment might feel like unglamorous work. But a well-organized workspace makes everything that comes after it faster and more enjoyable.
What You Learned
- Over ten parts, we'll build the café SOEL website using nothing but HTML and CSS
- VS Code is our code editor of choice — free, powerful, and the industry standard for web development
- We installed three essential extensions: Live Server, Prettier, and Auto Rename Tag
- Our project folder cafe-soel is organized with css, img, and js sub-folders
- We downloaded 12 image assets and placed them in the img folder, ready for future parts
- We created our first HTML file, index.html, and displayed "Hello World" in the browser
- Live Server's auto-reload feature lets us see changes instantly without manually refreshing